Showing posts with label food storage. Show all posts

Black Bean Brownies

Thursday, April 7, 2011


I have heard about this idea from several places but I was hesitant to try it because I didn't want to potentially ruin an entire box of perfectly good brownies by adding bean puree to it. The verdict was positive all-in-all so I will share them with you but I am still going to see if I can improve the flavor by making my own recipe instead of from a box. (I would like to enhance and deepen the chocolate flavor.)
We will start with the batter: The batter doesn't taste like beans, it is pretty good just as batter and it is easy to eat because you know there are no raw eggs in it.
The cooking process: I cooked them just like a traditional box of brownies, no time adjustments or anything. As the brownies cooked they smelled like beans cooking, not brownies; that was disappointing because I wanted that mouth watering brownie aroma wafting through the house.
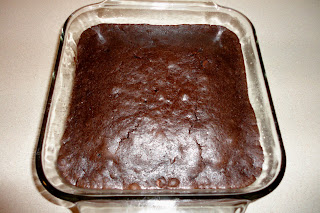
The final product: The texture is fudgy and moist. Neither my husband nor myself could taste any bean flavor in the final product and we both knew it was in there. I used a dark chocolate brownie mix. I prefer the strong chocolate flavor of dark chocolate so it was surprising when the beans seemed to balance that flavor out and the result was a little bland; lacking any strong flavor at all, bean or chocolate. I ate one brownie that night but did not feel tempted to go back for seconds. I went to bed that night thinking I probably wouldn't make them again. However, the next day I snuck another bite and they were so much better. It was surprising, but truthfully after sitting for a day at room temperature I liked them quite a bit and the texture was even better, too. If you decide to try this recipe I would recommend eating the brownies the day after you bake them for maximum satisfaction.

Serves: 9
Start-to-Finish: 40 minutes (more or less time depending on how long the brownie mix you purchased needs to bake)

Recipe By: www.idareyoutoeatit.com


Ingredients:

1 box brownie mix (I like to buy dark brownie mix)
1 (15-oz) can black beans
(or if you are starting with dry black beans: you want approx 1/2 cup dry beans that will turn into 1 2/3 cups of prepared black beans and you will add 1 cup water, blend together and follow the directions below for the bean puree.)

Directions:

1. Rinse and drain the black beans. (Rinse well; it cuts out a lot of the sodium in the beans)
2. Then spoon the beans back into their can and fill the can with fresh water.
3. Pour beans and water into a blender and puree until smooth.
4. Add the bean puree to the brownie mix and stir.
5. Pour into a lightly greased baking dish and follow the directions for baking as printed on the back of the brownie mix box.


Idareyoutoeatit.com also shared this fabulous idea for introducing food storage to your friends and family. (All you visiting teachers out there should have a light bulb going off right about now.) An assembled gift basket with a copy of the "black bean brownie" recipe, a box of brownie mix, a can of black beans, a few bananas, and a pint of ice cream. This will be a basket the whole family can enjoy.

Bean Soup

Wednesday, January 26, 2011

This recipe makes the cut! It has everything I want in a food storage recipe. It is shelf stable but, if you have the means, you can spice it up with fresh vegetables and meat. It is delicious just the way it is and it is a nice hearty meal. For three days in a row I ate this soup for lunch with a buttered, rolled-up flour tortilla and I loved it. To dress up this soup with fresh veggies, dairy, and meats I think it would be great with shredded chicken, tortilla chip noodles, cheese, and avocado. Garnish with some sour cream and cilantro and you have just turned "food-storage bean soup" into "every-day tortilla soup".

Serves: 4
Start-to-Finish: 6-8 hours (slow cooker recipe)
Recipe By: Amber Brunson


Ingredients:

1/2 cup dry pinto beans
1 cup dehydrated carrots
1/2 cup dehydrated onion
1/4 cup powdered milk (can substitute 1/4 cup sour cream if you're making it fresh)

1 cup salsa or taco sauce (I used mild but next time I would probably use medium because it takes a lot of heat to give the beans any flavor at all)
1/2 cup potato flakes
1 tsp salt

Directions:

1. Rinse pinto beans and soak in water overnight.
2. Drain all the water, rinse beans thoroughly, and place in crock-pot.
3. Add dehydrated vegetables to crock-pot with beans.
4. Add fresh water enough to cover all the vegetables and beans.
5. Cook on low for 6-8 hours or until the beans are fully cooked and soft.
6. Add the powdered milk, potato flakes, salsa, and salt.
7. Puree the soup in a blender until smooth.
8. Serve with warm tortillas.

New Recipes

Sunday, January 23, 2011

Lately, I have been giving a lot of thought to food storage. This is in large part because I was recently called to serve on the Preparedness Committee in my church. The church I belong to stresses storing food and water in the event of an emergency; along with creating a plan for where your family will meet up, how they will contact each other, and what options B and C are in the unfortunate situation that a natural disaster, economic downturn, emergency, and even job loss impact your family. "If ye are prepared ye shall not fear." (D&C 38:30)
There are hundred of online resources and books about the subject but at some point you need to know enough to ask the right questions and how to process the information you find or it's just data overload. That is pretty much the situation I have been in up to this point (and, to be perfectly honest, I am not entirely sure I've moved on from this stage). Nevertheless, I have decide to move forward with what I do know. And I know how to cook. So, I am starting to collect recipes of various dishes that incorporate food storage ingredients*. Not only is it cost effect to buy basic ingredients in bulk and make your own food but it is also healthier for your family to eat this way because there are less artificial flavorings, preservatives, and additives in your food. Unfortunately, some of the meals you can make with these ingredients don't taste very good. Let's be honest, there is surviving and then there is surviving. If I am going to start up a food storage program in the event of an emergency I want it to be surviving in the latter sense of the word. In the eyes of my 3-year-old, Wonder Bread with its light, fluffy texture wins hands down in a comparison to hand-ground, whole wheat bread. You could use that loaf as a door stop or a fuel alternative not a PB&J sandwich. I am looking for shelf stable** recipes that my family will actually enjoy eating. And, I am looking for alternate ways to make grocery items from home.
I don't own any fancy gadgets or equipment like a water-bath canner, a dehydrator, a wheat grinder, or a food saver. In fact, I don't even own a traditional blender. The only food shelving I have is the pantry that came with the house. I am at the begining and going from there. I will be incorporating my adventures into new food storage recipes and my thoughts on these foods in my blog. Enjoy the crazy ride.

*Food storage ingredients: Foods such as dried beans, whole grains, rice, etc... these are ingredients that can be air-tight sealed, stored at room temperature, and maintain nutritional value for 5, 10, sometimes 30, years.
**Shelf stable recipes: Recipes that only require pantry items to make the dish, thus the meal can be stored without electricity and made without perishable ingredients. I really don't like when someone lists a recipe as "food storage" simply because it includes rice in the ingredient list but the main items you need are chicken breast and two fresh pears. I can't raise chickens in my backyard and I wouldn't know how to prepare a live chicken even if I did so that is not going to work for me. I want my recipes to be two-fold: a meal I enjoy eating just the way it is, with only pantry ingredients, AND a dish that can be spiced up with fresh produce or meats if the option is viable.

Food Storage 101

Saturday, August 9, 2008

I am one of those people who just does not understand food storage.  I am absolutely clueless about ALL of it.  I used to think the Bishop's Storehouse and the Cannery were the same thing (don't laugh).  I do, however, completely understand the need for food storage.  So you can see my dilemma. 


I know food storage is a common topic in church and many of you may be wondering why I am so lost with this plethora of information at my fingertips.  Think of it like this: if you were trying to explain quantum physics to the average person, no matter how dummy down you make it, if someone doesn't understand the basics, they are not going to get it.  I wonder if those ladies in Relief Society who talk about freeze-dried sour cream flakes think I have the vaguest idea about what that means, how it relates, or why I would want them.  Do they assume everyone learns the "basics of canning" as a child, helping their moms?  Because that's never something my mom did with me.

So, I have set out on a quest to educate myself (and, hopefully my children) on what we need to do to be prepared.  I am learning so many things and I thought I would post regular blogs about the steps I have made. This way anyone else out there who needs a "Food Storage for Idiots" book can learn something, too.  (If you've had any epiphanies about the BASICS of food storage I would love to hear your comments)

Here is what I know so far:
  1. The Cannery is not the Bishop's Storehouse.  The Cannery provides food supplies for the Bishop's Storehouse.  The Cannery can also be used by individuals to create their personal food storage.  (I do not know what a cannery looks like or what is in one)
  2. If you don't live in Utah you may not have a cannery near your home.  For the location of your nearest cannery click here
  3. Many stakes purchase canning machines for their members to "check out" like a library system (I don't know how a canning machine works or exactly what you can do with it)
  4. The LDS website has a calculator that will tell you how much grain and legumes you need to store depending on your family size.  It also mentions that you will need to store other things like sugar, but it doesn't tell you how much. (Other things, very vague, can I get a list of all the other things
  5. If you have the money ($6,000), you can buy a pre-made, all-the-work-done-for-you, color-coded, complete family-of-five food storage for a year
The questions I hope to answer next:
  1. What does a Cannery look like
  2. How does a canning machine work
  3. Is the Cannery the same as the Home Storage Center
  4. What are the other things I need to store 
websites I have found to be helpful: 
Buy food storage and organizer online  www.shelfreliance.com
Much more detailed food calculator lds.about.com